| Attendance Sheet |
Last Updated: Aug 30, 2013 01:17PM EDT
The backup feature on the TCMS software is a powerful tool that allows you to recover any data that has been changed or lost. It is recommended that you create a backup of your database so you can have the option of recovering data. Creating a backup is very quick and easy.
To create a backup of your database, you will need to click on the System Settings icon. Afterwards, you will need to double-click on Backup/Restore Database Files. Once you open it, you will have to select whether you want to Back up the database or Restore the database.
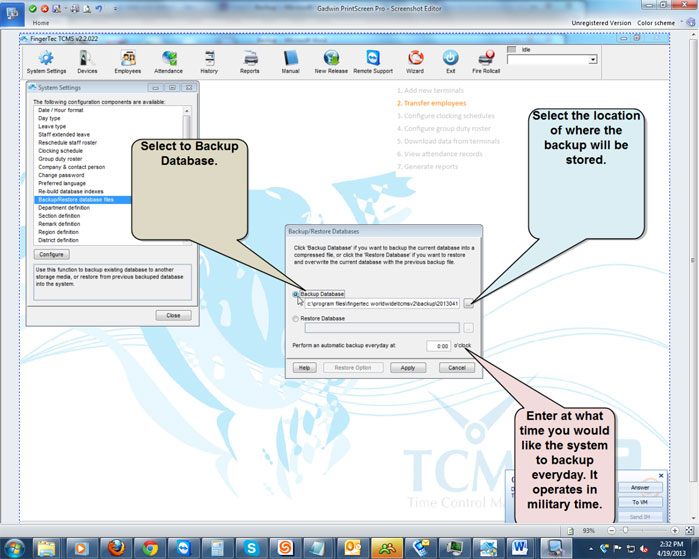
To backup the database, you will need to select "Backup Database", and then you can select a specific location for the backup to be stored in. The default location is inside of the TCMSv2 Folder, which contains all of the data on the TCMS software. You have the option of changing the location. Once the location is set, you will just have to click on "Apply" to create the backup.
You can also set the software to automatically backup the database at a specific time every day. You will have to enter the time that you want the system to backup everyday at in military time, then click on "Apply". After clicking on "Apply", you should be able to find the .zip file of the database in the location that it was sent to.
Restoring The Database
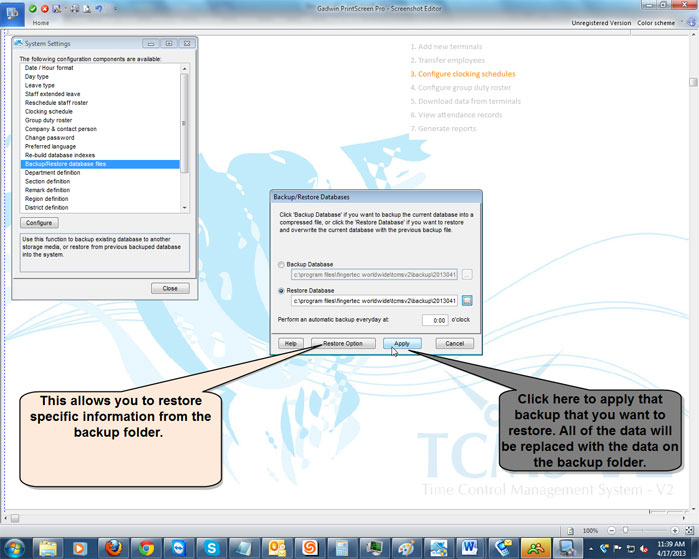
To restore a database that you previously backed up, you will have to select "Restore Database". Once you select it, you will have to click on the box next to "Restore Database" to look for the location of the backup that you want to restore.
You will have to navigate to the folder that contains your backup folders.
Once you find the backup that you want to restore, you will have to select it and then click on "OK". After you click on "OK", you will just have to click on "Apply" to make the changes. You also have the option of clicking on "Restore Option" to restore specific information from the backup folder if you do not want to restore all of the data in the backup folder.
There are many pieces of data that you can restore from a backup folder using the Restore Option. When you click on Restore Option, you can select which field contains the data that you want to retrieve.

The Employees field will allow you to restore specific data such as the Users Records which contains just the users information (Name, Department, Address, SSN, Pay type, etc.). You can also retrieve the Employee Management data, which contains specific information such as the employee Name, Privilege, and Password. The Attendance Sheets will allow you to retrieve specific data that was on the attendance sheet for the employee that you select. You can also select which dates you want to recover if you do not want to recover all of the data on the backup folder.
The Devices field contains specific data that was set for your device. By checking the box next to Fingertec Terminals, you will be able to retrieve data that was set for your terminal (such as the product key, & activation code). By checking the terminal data audit list, you will be able to retrieve the specific information that was on the audit list, which contains your employees punches (Ins, and Outs)
The Clocking Schedule field will allow you to restore specific Clocking Schedules that were made on the backup. This will allow you to quickly restore a clocking schedule instead of having to create a new one and assigning all the rules to that schedule.
The Group Duty Roster field will allow you to restore specific data in the Group Duty Roster. This will also allow you to quickly restore a group roster instead of having to create a new one and assigning all the rules to that group.
The Department Definition field will allow you to restore the Departments that you had created on that backup folder.
The Section Definition field will allow you to restore the Sections that you had created on that backup folder.
The Remark Definition will allow you to restore specific remarks that you had created.
After clicking on "Apply", you should get a pop up that says "Process Completed". Afterwards, you will have all of the data that was in the folder that you restored.

