| Clocking Schedule |
Last Updated: Feb 25, 2014 11:32AM EST
This article will explain how to setup work codes for employees to use to keep track of how much time is spent working at a specific job/task.
If employees have different jobs or tasks throughout the day, you can setup work codes on the device so it prompts the employee to select a specific job/task when clocking in or out. Works codes can come in handy if employees receive a different rate per hour depending on which job/task the employee is working on throughout the day. This way, you will be able to keep track of exactly how much time your employees spent doing a specific job/task so you can pay them accordingly.
To setup the work codes, you will need to click on System Settings > Remark Definition.
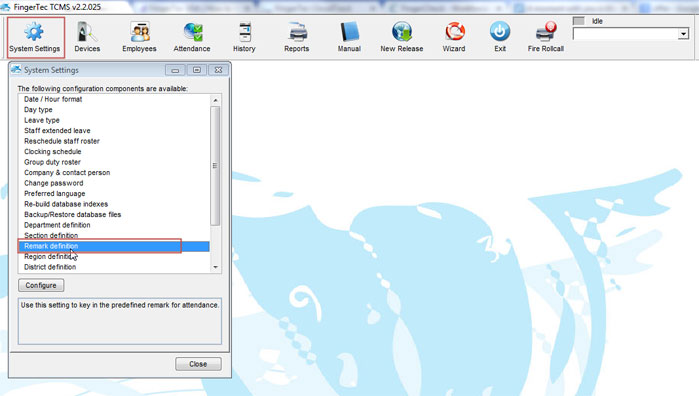
Afterwards, you will need to type in the name of the job/task that the employees will select when clocking in and out under the “Remark” column. You will also need to give each remark a 2-digit code number that will represent that specific remark on the device. Since the code has to be two digits, we recommend starting from the code number “01” and working your way up. Once you have typed the remarks and codes, click on save.
Afterwards, you will need to send the work codes to the device by clicking on Devices > Setup Fingertec Terminals > Advanced Settings > Workcode.
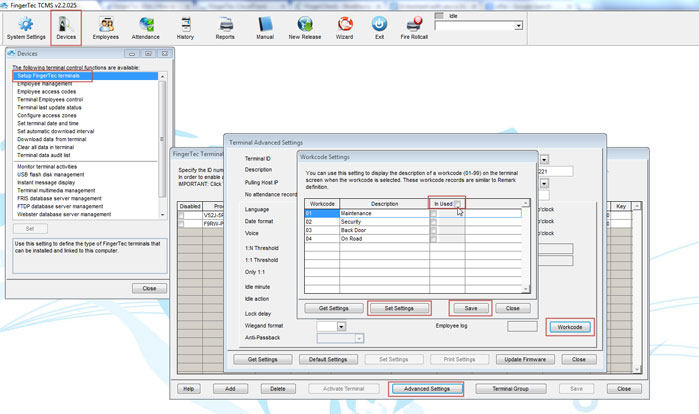
If you would like to apply all of the work codes that you have created into the device, you will need to click on the checkbox next to “In Used”. That will select every work code, and then you will need to click on Set Settings. Once you get the pop-up “Process Completed”, the device will have the work codes for your employees to select when clocking in or out.
After the work codes are setup on the device, you will need to set the setting on the TCMS software to allow you to view all of the work codes that all employees clock into. To set this setting, you will need to click on System Settings > Clocking Schedule > Edit > General.
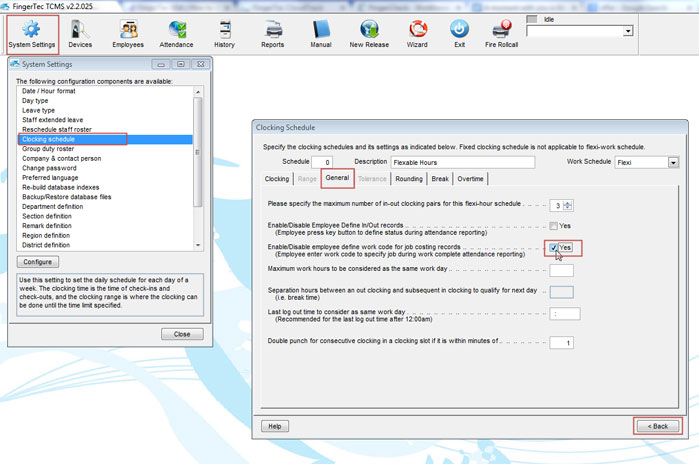
You will need to check the check box next to “Enable/Disable employee define work code for job costing records”. Once the box is checked, click on Back, and then click on Save.
Once the setting has been saved, you will be able to view the work codes that have been selected on the attendance sheet.
For more information on how to edit information for employees that are using work codes, please click HERE.
Please Note:
• To update the device to use work codes, the device needs to be connected over TCP/IP.
• You can have up to a maximum of 99 work codes (code number 01 - 99).
• You can setup the rate per hour for each employee in the Remark Definition by clicking on “Rate/Hr”.
• By default, employees will have to press a certain button on the device to select the work code before clocking in or out. If you would like the device to prompt a window to select a work code when clocking in or out, you will need to update the firmware of your device. To update the firmware, please contact our support team at 1-800-921-4270 extension 2 or feel free to chat with us online by clicking HERE.

