| Issued Date |
Last Updated: Dec 12, 2013 12:26PM EST
Question:
Are you trying to add data for your employees prior to their start date?
Answer:
If you want to manually enter punches for an employee for a date before their current issued date, you would need to change the issued date. You can only edit data of an employee starting from the Issued date. Please see below for the step by step instructions on how to make these changes.
To change the Issued Date, for one specific employee, follow these steps:
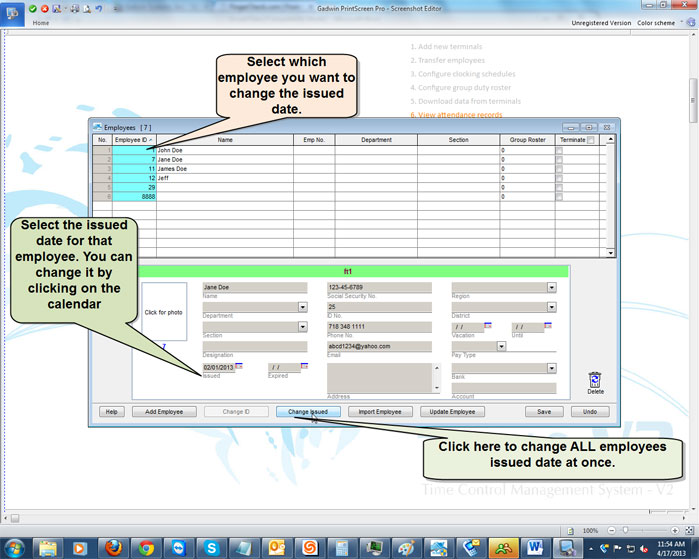
• First click on the Employees icon in the TCMS software.
• Then click on the employee that you want to change the issued date for.
• Once you select the specific employee, on the bottom section, you should see different fields where you can enter the employee's information. One of those fields says "Issued" under it. If you click on the Calendar next to the field where you would enter the date, you can select a specific date to be the Issued Date of that employee.
• Lastly, once you change the issued date, you will have to click on "Save" to save the changes.
HOW TO:
To change the Issued Date, for the entire company at once, please follow these steps.
• First click on the Employees icon in the TCMS software
• Then click on the button on the bottom left that says "Change Issued".
• Lastly, select the desired, Issued Date for all and click on "Save".
Once you save the changes, you will have to generate the Attendance sheet to view the changes. Before you generate the attendance sheet, it is recommended that you create a backup of your database since you will be making changes to the data on the software.
For more information on how to Generate the Attendance sheet, please Click Here.
To make a backup, you will have to click on System Settings > Backup/Restore Database Files > select Backup database files and then click on Apply.
For more information on how to Backup/Restore Database Files, please Click Here.

